


The countdown to Halloween has begun and everyone is putting the final touches on their costumes. Kids are excited to go trick-or-treating, and they’re betting they’ll get more candy than their siblings. But where will all that candy go? Everyone who dresses up and goes trick-or-treating needs a good bag for all that loot, but most of the options at stores look the same or don’t match your kid’s costume. Fix that with this simple and quick DIY Halloween trick-or-treat bag, which is fully customizable and includes reflective straps for safety as you walk around the neighborhood.
Start with a piece of fabric in your favorite coordinating Halloween print. I bought a full yard of this pumpkin fabric so I could make additional accessories with the scraps.

Fold the fabric in half, and then iron it with a high-steam iron like the Durathon to get any wrinkles out. The folded end will act as the bottom of our bag, so it saves us an extra stitch.

Gather a pair of scissors, a measuring tape and a fabric pencil to measure the bag to the appropriate size.

The orange and black bag is for a smaller child, so I measured 12 inches across the bottom…

…and 14 inches up the sides.

Mark the fabric at your measurements, and cut the fabric into a rectangle.

Unfold your cut rectangle of fabric and re-fold it so it’s inside out. Iron it so the bottom of the bag is creased and flat. The right sides of the fabric should be looking in towards each other.

Pin one side of the bag from the bottom to the top. Repeat on the other side, but be sure to leave the top of the bag open.

Again, make sure the right side of the fabric is on the inside. Later, we’ll turn the bag inside out again, exposing the pretty side of the fabric and hiding the seams.

Sew each side of the bag, starting at the top and going to the bottom, making sure to backstitch at the beginning and end of each seam.

Your bag is starting to look like an actual bag now! The pretty side of the fabric is on the inside and the top is wide open.

Loop the bag on the end of your ironing board and open up the fabric along the seam.

Use your iron to press the seam, so it’s nice and flat. Repeat on the other side.


Fold down the top of the seam ⅝ inch around the entire top of the bag.

Pin the fabric and press it with your iron.

Sew along your top seam at ½ inch, remembering to backstitch at the beginning and end.

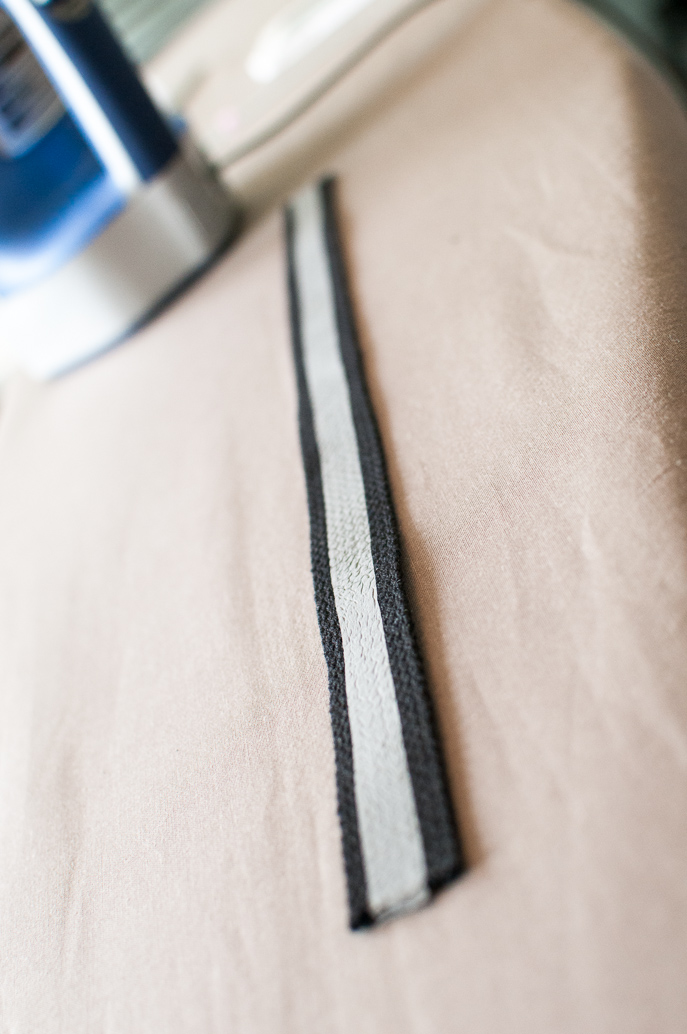
To make handles, measure webbing in your favorite color to 18” and cut two lengths. You can also buy a yard of webbing and simply cut it in half.

Measure the same amount of iron-on reflective tape. Peel off the protective layer, per the instructions on the package, and lay it over the center of the webbing.

Gently iron on the reflective tape.

When you are finished, your webbing should look like it has a reflective strip going down the center, like this.

Loop the webbing into a U-shape with reflective side down.

Measure one side so the inside of the handle rests three inches from the side seam and about an inch down. Pin it into place, making sure to only pin one side of the bag, so you don’t sew it closed.

Repeat on the other side.

Sew two levels of stitches over the handle, going back and forth a few times to really secure it in place.

Now, you can turn the bag inside out. The pretty fabric and the reflective tape should all be facing out.

At this point, you can leave the bag as-is and iron it flat, or you can continue to embellish it.

Iron the bag flat to remove any wrinkles.

If you want to embellish the bag further, you can. I used a little ribbon of pom-poms that matched the fabric. Just wrap it around the bag, trim it and pin it into place. Sew it on.

The bag looks pretty cute now, doesn’t it?


But it could use just one more thing… How about some matching glow in the dark paint for a little extra fun (and safety) at night?

I chose colors that matched some of the polka dots on the fabric and went over them to make little dots.

Let it dry and then you’re all finished!

You can use the same method to create bags in lots of colors and styles, matching any costume a kid can dream up. You can also make bigger or smaller bags by adjusting the measurements in the beginning.

For this black bag (to match a witch costume), we used 14”x16” measurement and embellished it with beautiful ribbons and a clip-on flower.

These finished bags will make a little witch and a cute pumpkin happy while they trick-or-treat on Halloween.

It only takes 15 minutes from start to finish to make these simple bags.

You could even make one for yourself in a nice fabric and have a simple reusable shopping tote. Or let the kids use the bags all year for creative play and fun.
Thanks for checking out our latest DIY with the Durathon iron. Happy Halloween!

More DIY Ideas:
https://blog.hamiltonbeach.com/diy-fathers-day-gifts-custom-koozies/
https://blog.hamiltonbeach.com/pillow-talk-iron-summer-throw-pillows/

With incomparable steam output and a nonstick soleplate that is ten times more durable than traditional nonstick, you can’t go wrong with a Durathon® iron at your side. It simply outperforms and outlasts most irons on the market—period.
Comments