

Wedding season is in full swing. If you’ve had to travel for weddings you’re probably familiar with receiving a welcome bag upon your arrival at the hotel – whether it’s filled with maps of the surrounding area or the trusty kit for the next morning complete with water and Advil. The favors always provide a warm welcome to guests and give the couple an opportunity to share their love for their city.
These DIY iron-on welcome bags are a great idea for couples who want to save a little cash all the while doing something special to welcome their guests.
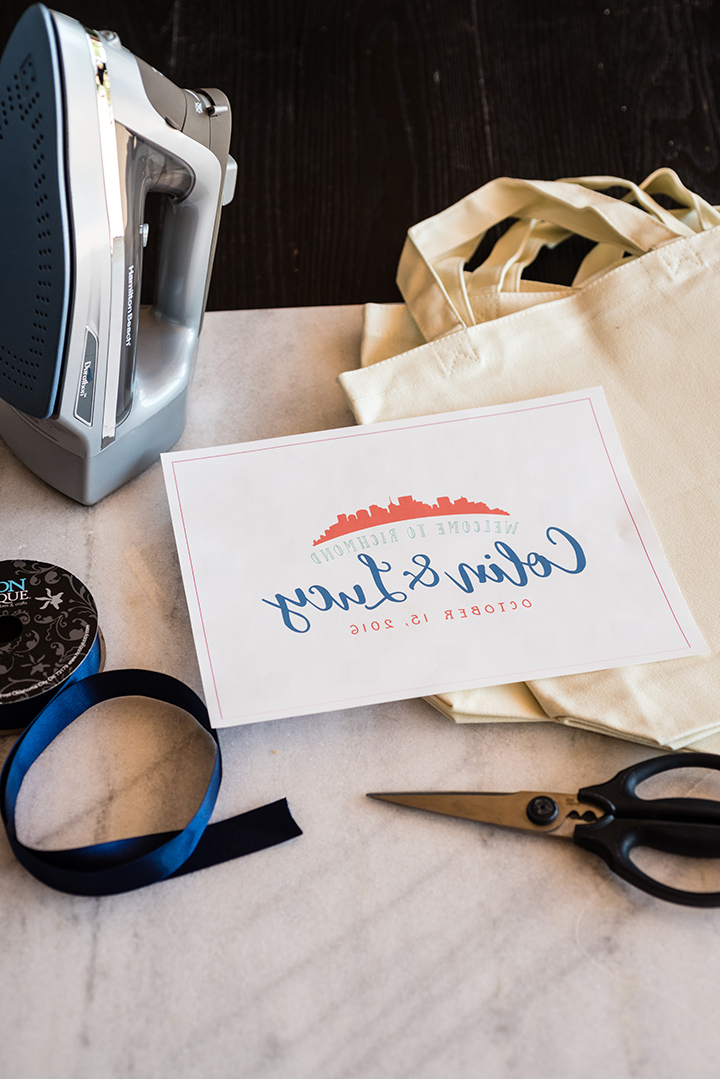
Here’s what you’ll need:
- Canvas bags
- Transfer paper
- Printer
- Scissors
- Durathon Iron (Enter to win one of your own using the Rafflecopter widget at the bottom of this post)

We purchased canvas bags from a local craft store but you could order them online. We created our design for Colin and Lucy in Photoshop but you could use another program like InDesign or Illustrator – whatever program you are most familiar and comfortable with. Or for desperate times, recruit one or your tech-savvy, artistic friends to create the design for you.
Once you have your colors, font, and design set in stone, you’ll need to print your design onto transfer paper. You can purchase transfer paper at craft stores, office supply stores or online.
You will want to print your design onto transfer paper using a printer. Either an inkjet or laser printer will be specified on the transfer paper directions. It is very important you print a mirror image of your design. Your printer will have a mirror mode or you can create mirror images in the program you create the design in – either way will work.
Once your sheets are printed, it’s on to ironing. Directions vary by the type of transfer paper you purchase, so make sure you are following the directions that can be found on both the packaging and the individual sheets.

For our particular brand of transfer paper, it directed us to use two hands to apply adequate pressure onto the transfer sheet. The directions also said to cut the transfer sheet as close to the design as possible. Our design has a helpful border to help us keep cut in a straight line but you could use a ruler to help trace a border around your design and cut along those lines.

We ironed the transfers for about 90 seconds using our Durathon® iron, remembering to not use steam, which the transfer sheet also noted, and made sure to apply constant pressure. We let the sheets cool and then carefully – very carefully – pulled the sheet up leaving the design transferred onto the welcome bag.

Now for the best part – filling the bag with hometown goodies to greet your guests with. We chose a Richmond magnet that your guests can take home as a souvenier, local coffee, local bloody mary mix and a greeting card. You could fill these bags with whatever you like but your guests will definitely appreciate the time and effort put into making these cute custom bags and welcoming them to spend your special day with you and your loved ones.

While these DIY iron-ons are great for wedding favors, you could absolutely have fun creating custom totes for a craft day with the kids or even personalizing your reusable grocery bags.
Visit our website to shop our entire line of Durathon® irons and enter to win a Durathon® Digital Iron with Retractable Cord using the Rafflecopter widget below.


Enjoy scratch-resistant durability and superior glide performance with the Durathon® Digital Iron with Retractable Cord.
I do like to iron, I find it therapeutic and relaxing.
i love to iron so i can make my clothes look like new
My dad used to own a dry cleaners overseas. hr used to always iron for us our school uniforms, I guess I just loved the steam that escaped into the air and how crisp the clothes would be. Winter was the best. Fresh hot warm clothing to wear. Plus now it brings those memories of my dad back .
I iron a lot, because I love that fresh pressed look- can’t say I really ‘love’ to iron though, but I do!
I have been ironing since 10 years old, and I like to iron because I want my daughter’s dresses and my son’s shirts to look nice for Sunday Church! I ironed all my clothes when I was growing up.